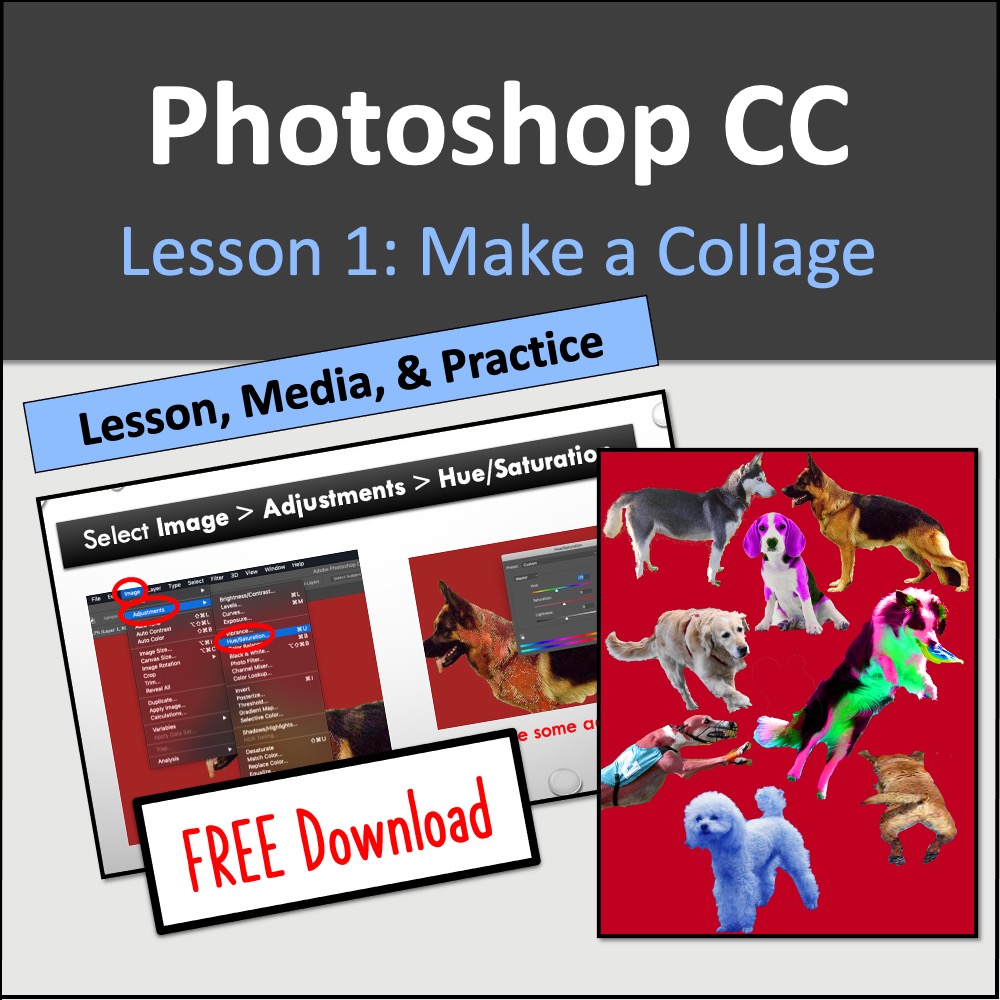
Adobe Photoshop CC is a wonderful tool that creatives use to produce a myriad of unique designs, including editing photos, graphic design, web design, or video editing. For brand new students, it can seem daunting to get started. I have created this free step-by-step Adobe Photoshop tutorial for beginners to simplify the learning curve. This FREE tutorial for Adobe Photoshop CC will teach you how to make a dog collage!
You will remove the backgrounds to isolate the dogs, and then combine them all into one NEW image. Who doesn’t love a bunch of cute, inanimate digital pups? Digital dogs don’t make messes in your house, at least. The Google Slides version of this Adobe Photoshop CC Lesson is also available!This lesson plan is geared toward high school graphic design students, but anyone can use it to learn Photoshop! It contains 27 pages of instructions for creating a fun collage!
My Adobe Photoshop Experience
I started teaching my graphic design course to high school students in 2017. Photoshop is a very complex program. I wanted my first lesson to dive into the foundational skills my students would need, and also be fun and engaging. I knew that I should teach them to manipulate images and create something new and unique so that they would understand and appreciate the power of Photoshop right away!Here are the specific skills you will learn about in this FREE Photoshop lesson:
- zooming & panning
- locking and unlocking layers
- paint bucket tool
- eyedropper tool
- erasing picture backgrounds (two methods: using eraser tools and using quick selection tool + mask)
- history brush tool
- transform tool
- magic wand tool
- making image adjustments
- exporting to a jpg
Students will create a dog collage in order to learn Adobe Photoshop CC. Who doesn’t love a bunch of cute inanimate digital pups? Digital dogs don’t make messes in your house, at least.
Check out this video preview of the lession
TpT Account Set Up
Anyway, to get started, you’ll need a TeachersPayTeachers account. Don’t worry, it’s completely free to sign up. Just follow the prompts and you’ll be logged in to your free account in no time!
Once you’ve completed that step, click on this link to go to the Adobe Photoshop CC Lesson. Once there, you’ll download the free lesson using the large Download button. Extract the files to your device, open the folder, and there you’ll find both PDF and PowerPoint slides of the same material. Open the material to get started. Click here for the Google Slides version.
Set Up Adobe Photoshop CC
If you don’t already have Adobe Photoshop CC installed on your computer, you’ll want to click here to purchase and download the software. They even offer a free 7-day trial if you just want to try it out first.
Getting Started: Creating a Canvas
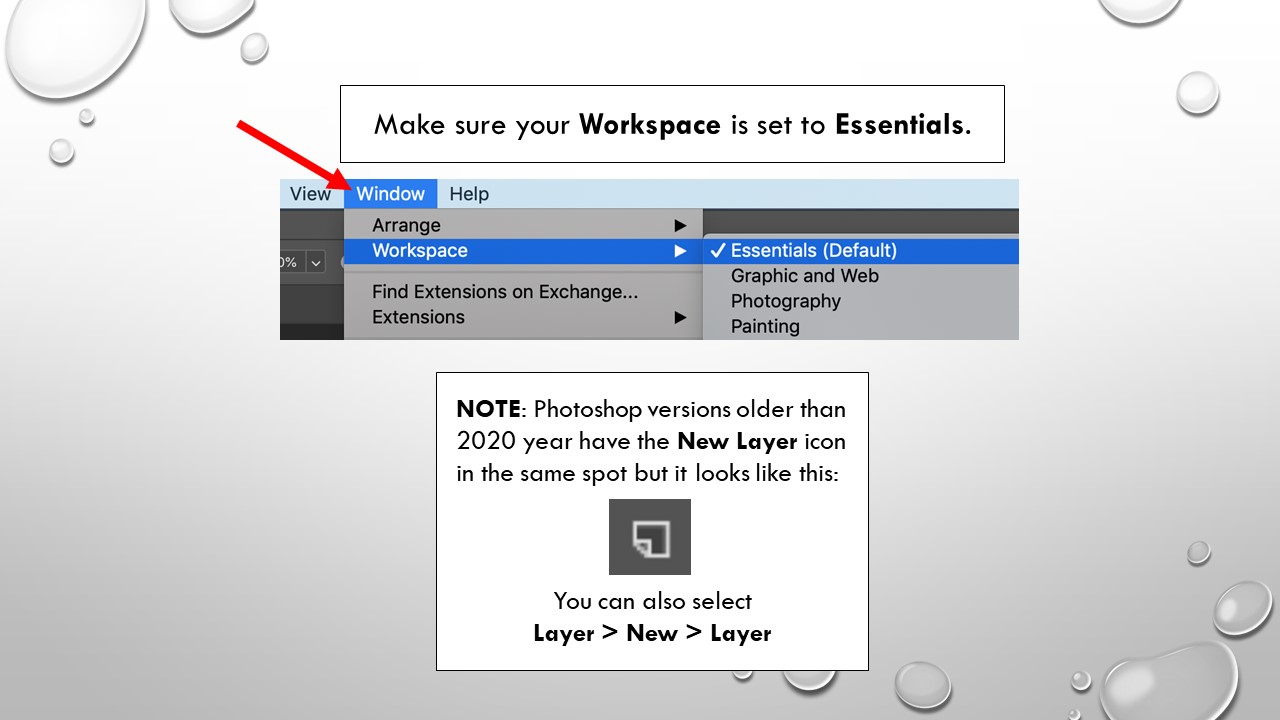
Opening back up to the lesson, the first few slides will show you and your students how to get started. The first item of importance is to set your Workspace to Essentials under the Window menu. This will arrange all your toolbars as the default, and your screen will match the screenshots that you find in this lesson. I’ve also included a few notes for those following along with an older version of Photoshop CC.
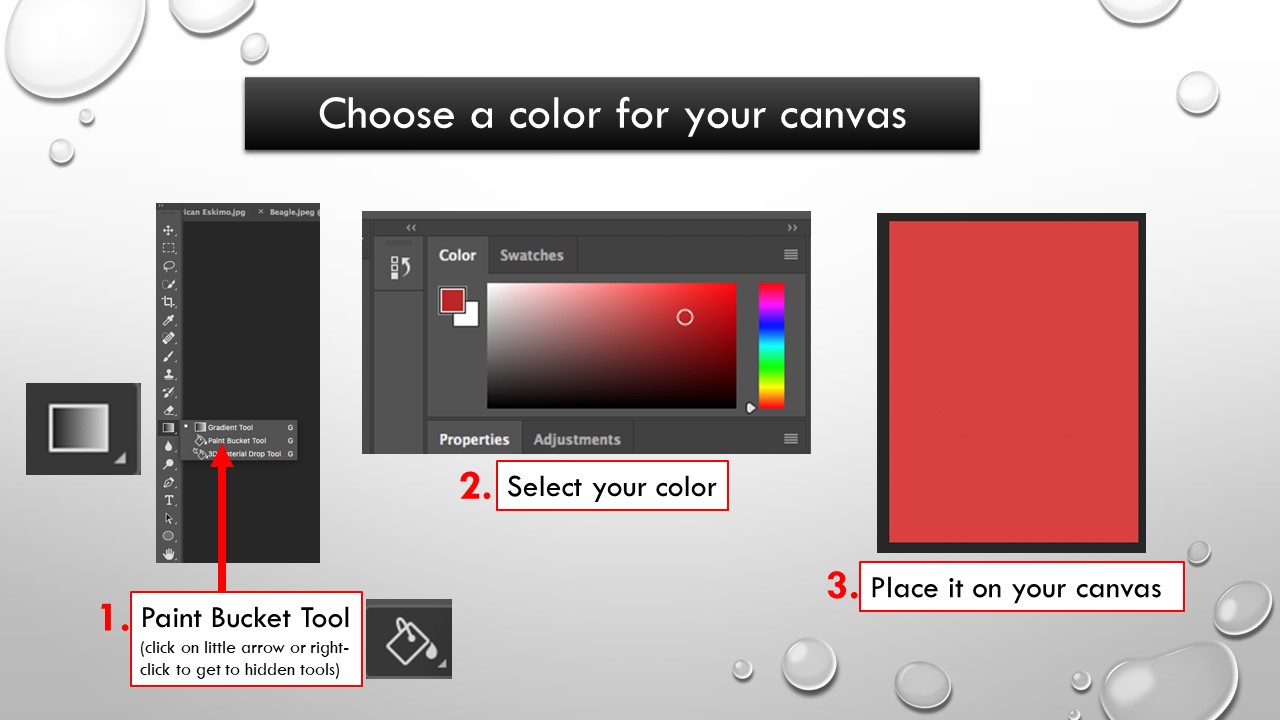
Create a Canvas and Choose a Color
Next, we will dive into how to create a canvas and choose a color. You get to have some creative input here. Enjoy!
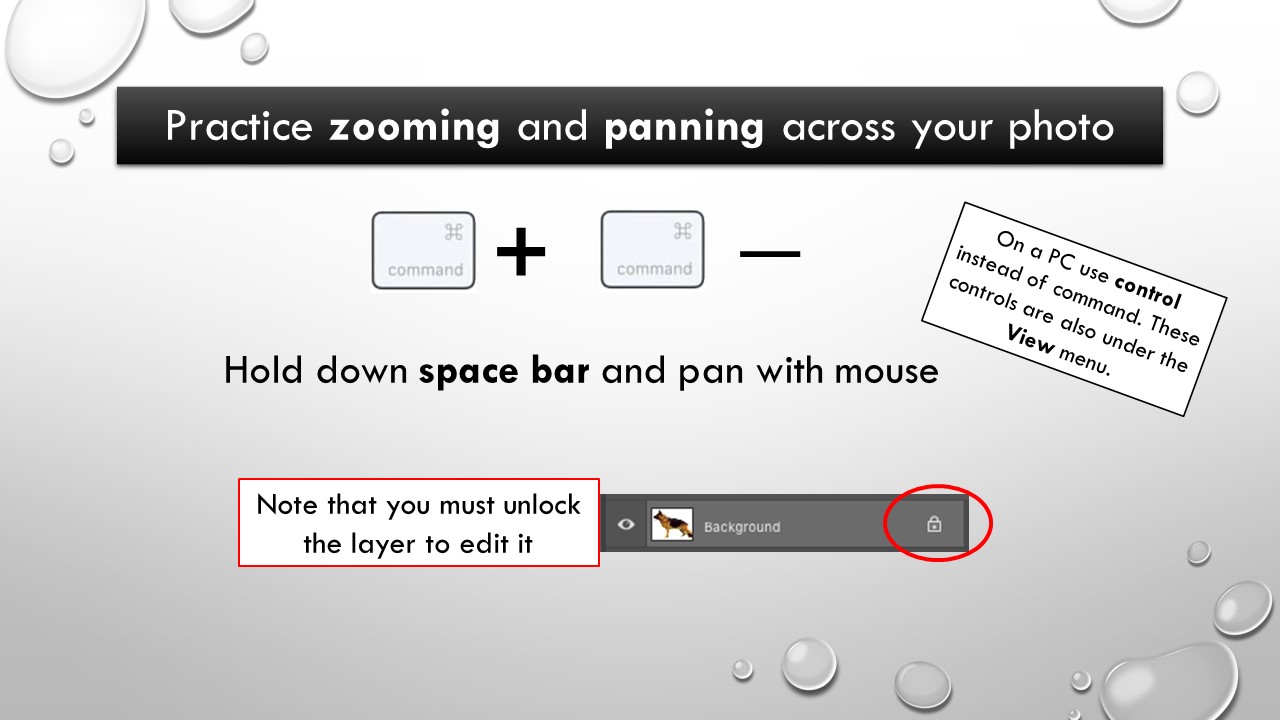
Practice Zooming and Panning
I’ll teach you how to zoom and pan in the program. It’s important to note that you have to unlock the layer before you edit it. I’ll show you how to do that. I also always try to include notes to include both Mac and PC users.
Eraser Options
Did you know that there are multiple eraser tool options in this graphic design software? You can try the Eraser Tool, the Background Eraser Tool, and the Magic Eraser Tool. The Magic Eraser Tool truly does feel magical; it lets you take away the entire background with just one click! But it works best for neutral backgrounds. We’ll learn what to do for a more complicated background, like a picture of a dog surrounded by grass and trees!
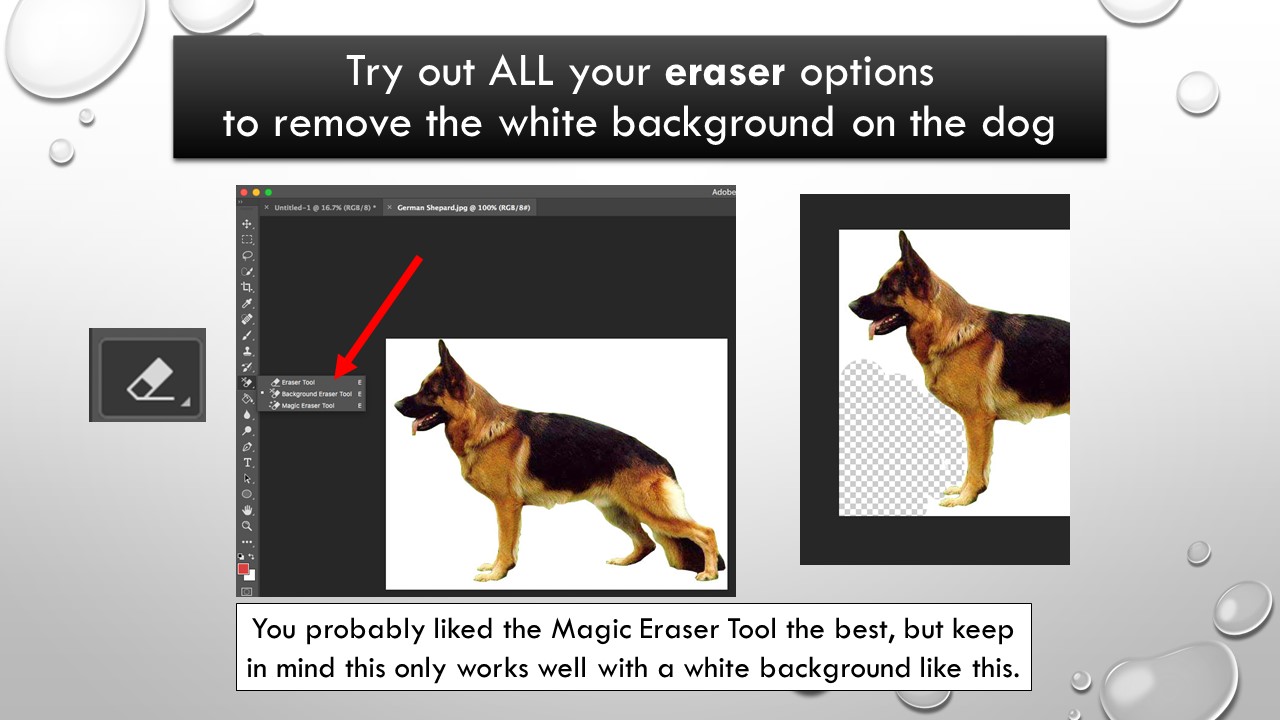
Don’t worry, I’ll teach you how to revert to the original image as well, in case you make a mistake. There’s an Undo button even for Photoshop! I’ll also walk you through how to use the History Brush Tool. This tool makes a copy of the image as it was in a previous state, then uses the content of this copy to let you paint the image back in. So if you get a little overzealous with the erasing, this is your “fix it” tool!

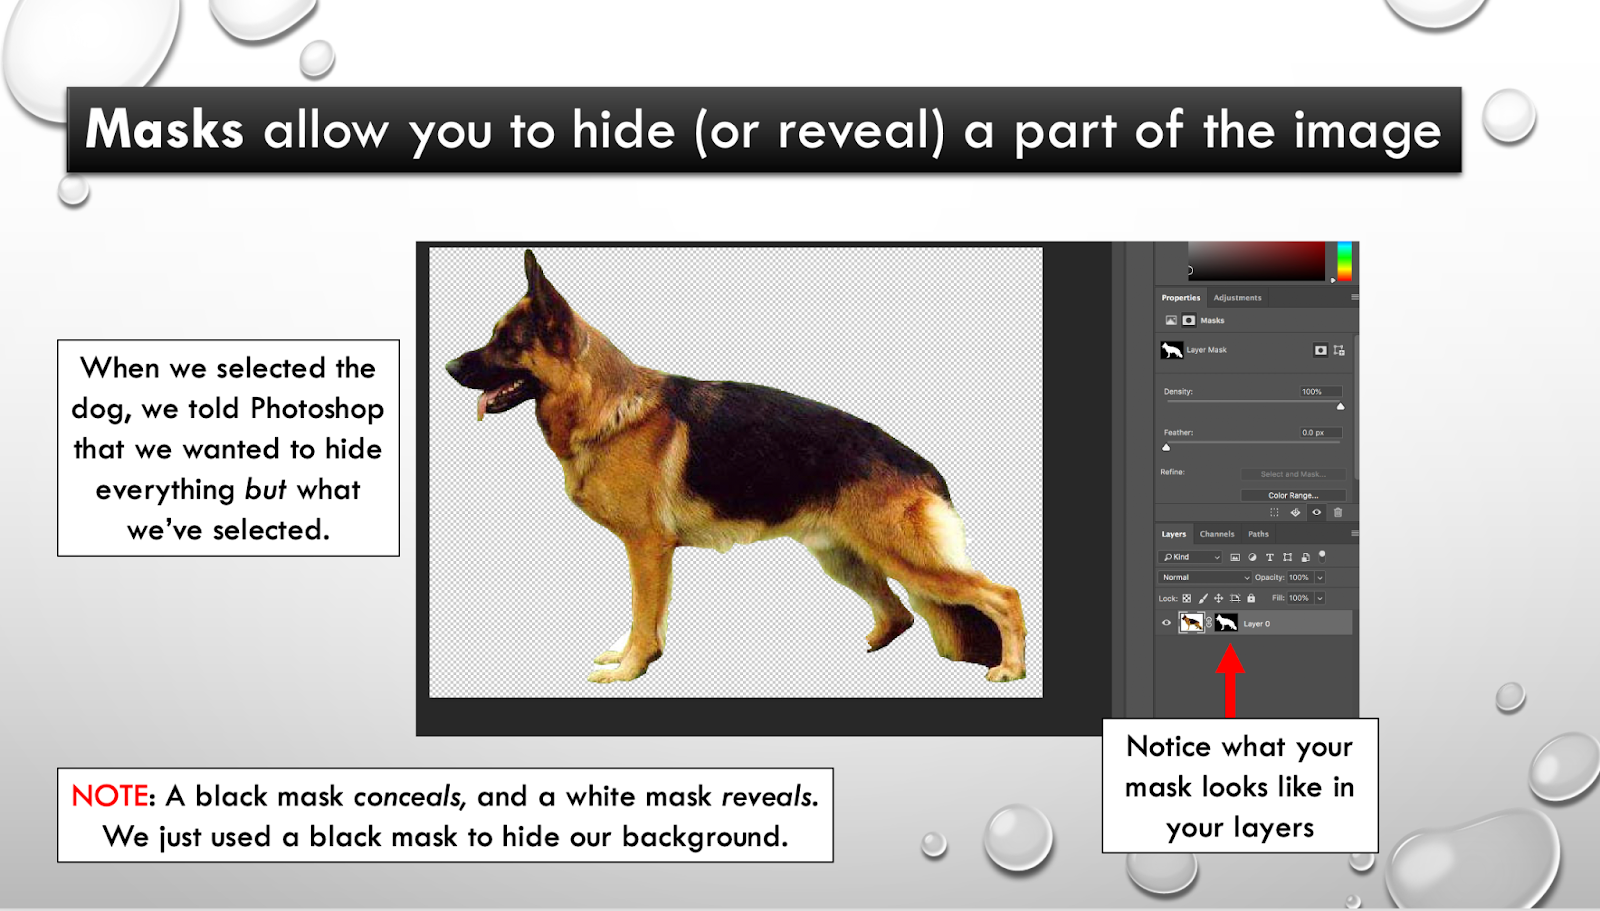
Layer Masks
You don’t have to use an eraser to remove a background. There’s actually a much fancier way that I will show you. It involves using the Quick Selection Tool to select your dog, and then placing a layer mask on top of him. This will cut out everything except for your dog! Using a mask doesn’t actually destroy any of the pixels in your original image. Instead, it just “hides” the parts you don’t want. My students usually like using this method the best, but find that they need all of the strategies in their toolbox in order to tackle different kinds of images.
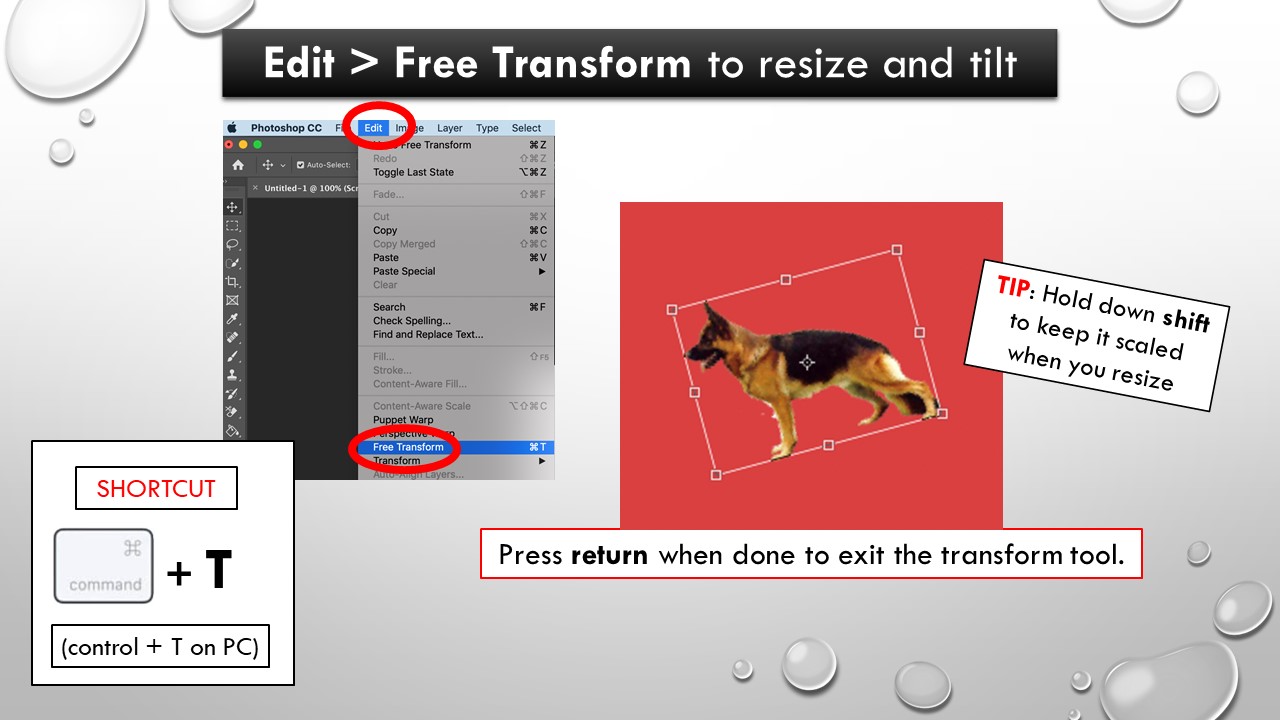
Transform Tool
Once the dog is moved onto your canvas, you’ll learn how to resize and tilt him using the Transform Tool under the edit menu. You will also learn the shortcut keys. Don’t forget to hold down the shift button to keep your image scaled when you resize!
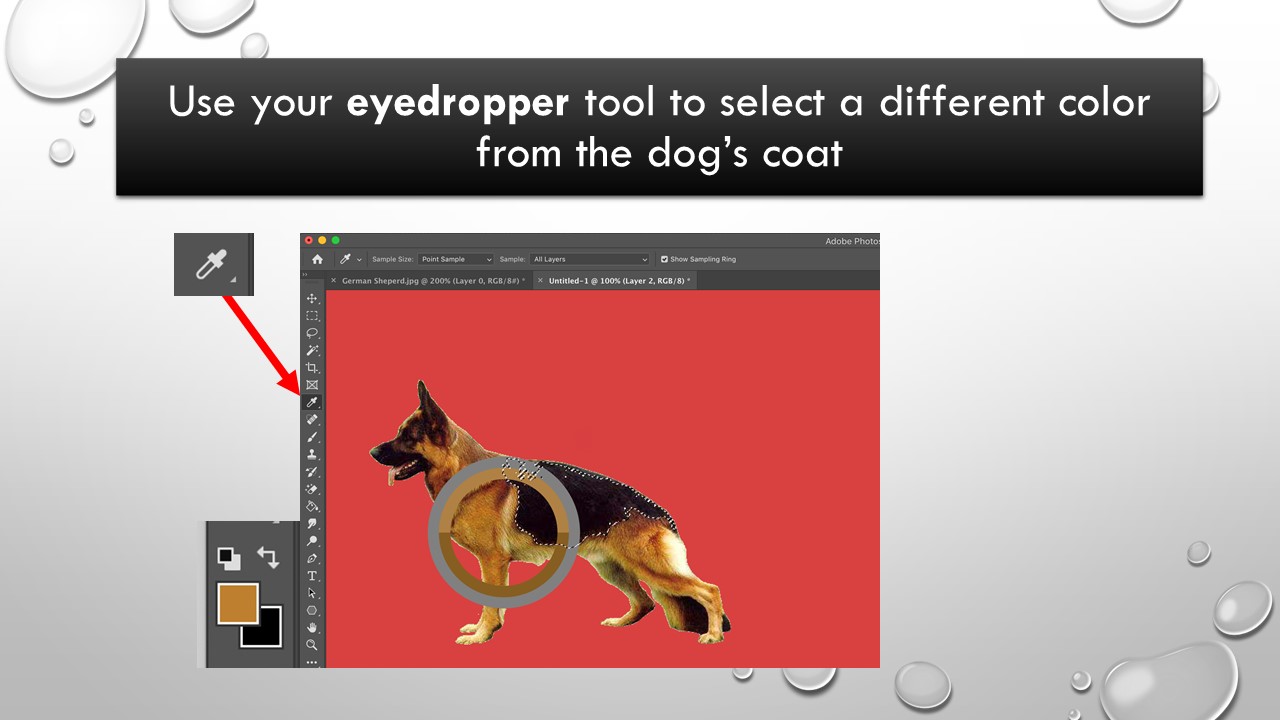
The Magic Wand Tool
This dog is made up of LOTS of colors. Even in areas that seem the same, if you really zoom in, you will see that he is actually made up of many, many different shades. If you’re re-coloring a dog, you don’t want to just start painting over him with a solid color - that will look super fake! Instead, the Magic Wand Tool chooses pixels based on tone and color. This tool is under the Quick Selection Tool.
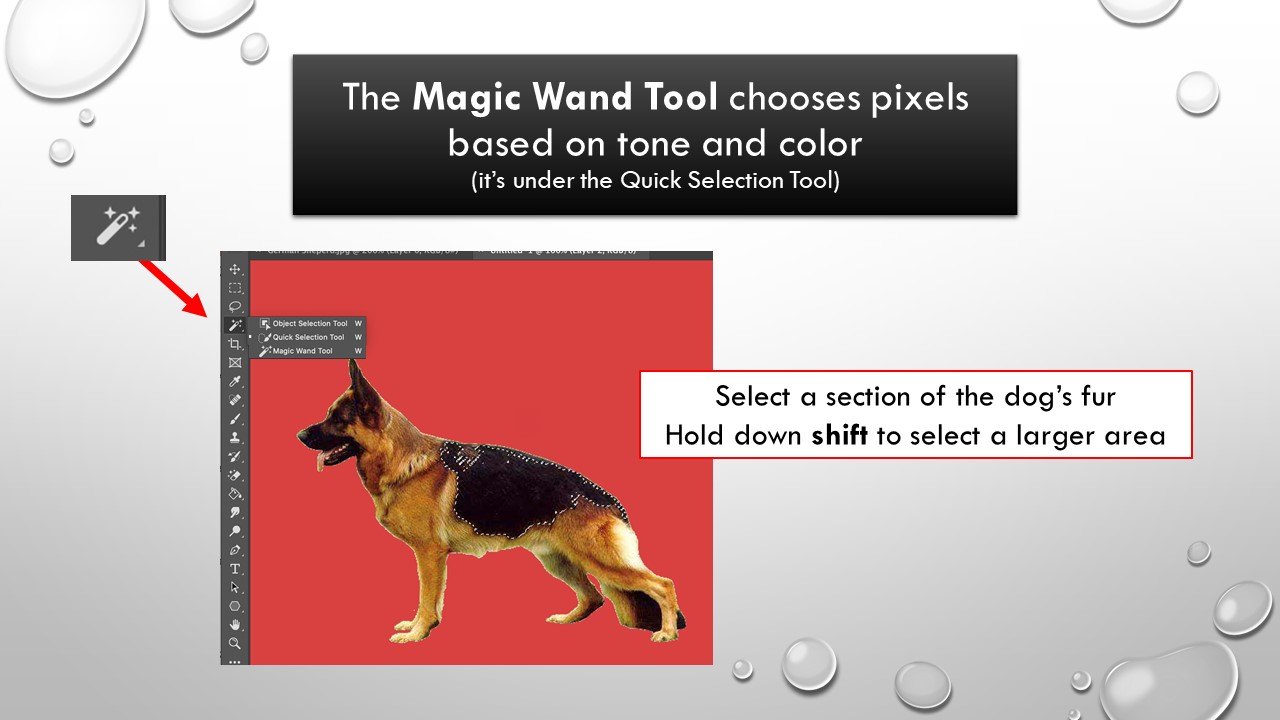
Now you can make more subtle changes that will look more realistic. My lesson will walk you through how to use the Eyedropper Tool to recolor the selection.
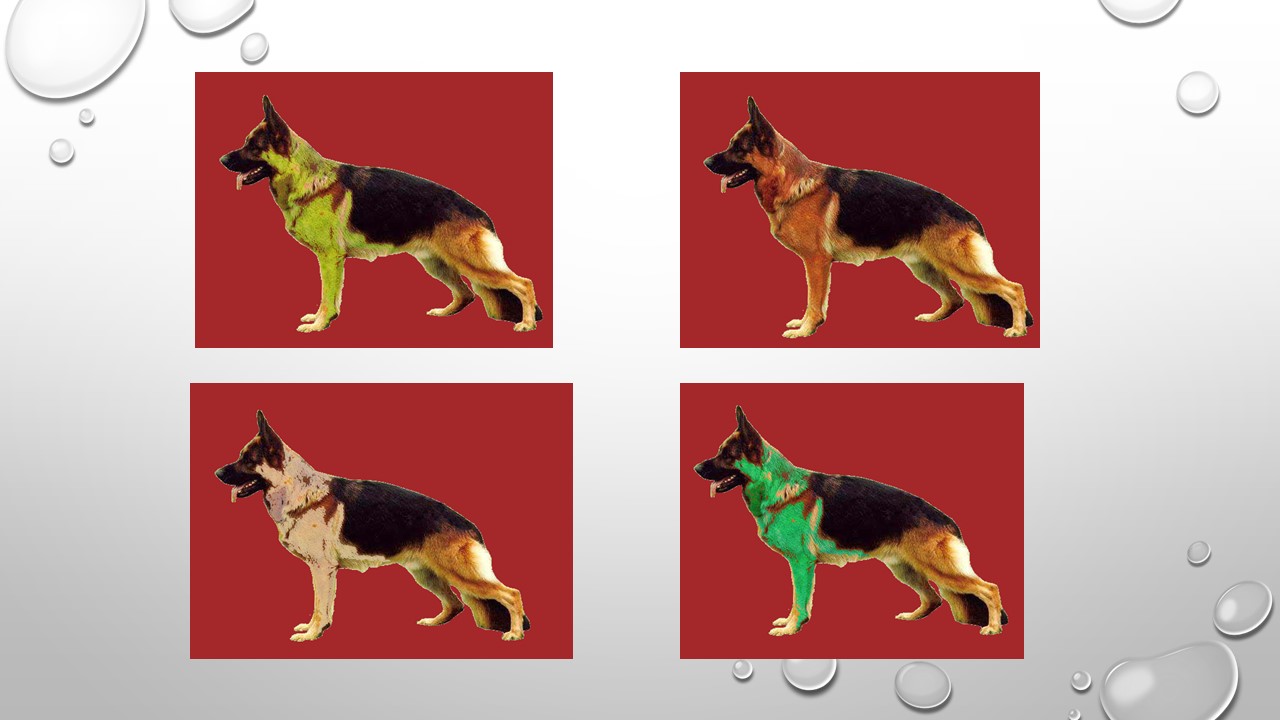
Making Image Adjustments
Next, you’ll have some fun making image adjustments to your dog. . Experiment with the various settings such as Hue/Saturation, Vibrance, Exposure, Brightness/Contrast, and Color Balance. In these pictures, I used the Magic Wand Tool to select just some of the pixels in the front half of the dog. Can you guess which image adjustment setting I played with in these images?
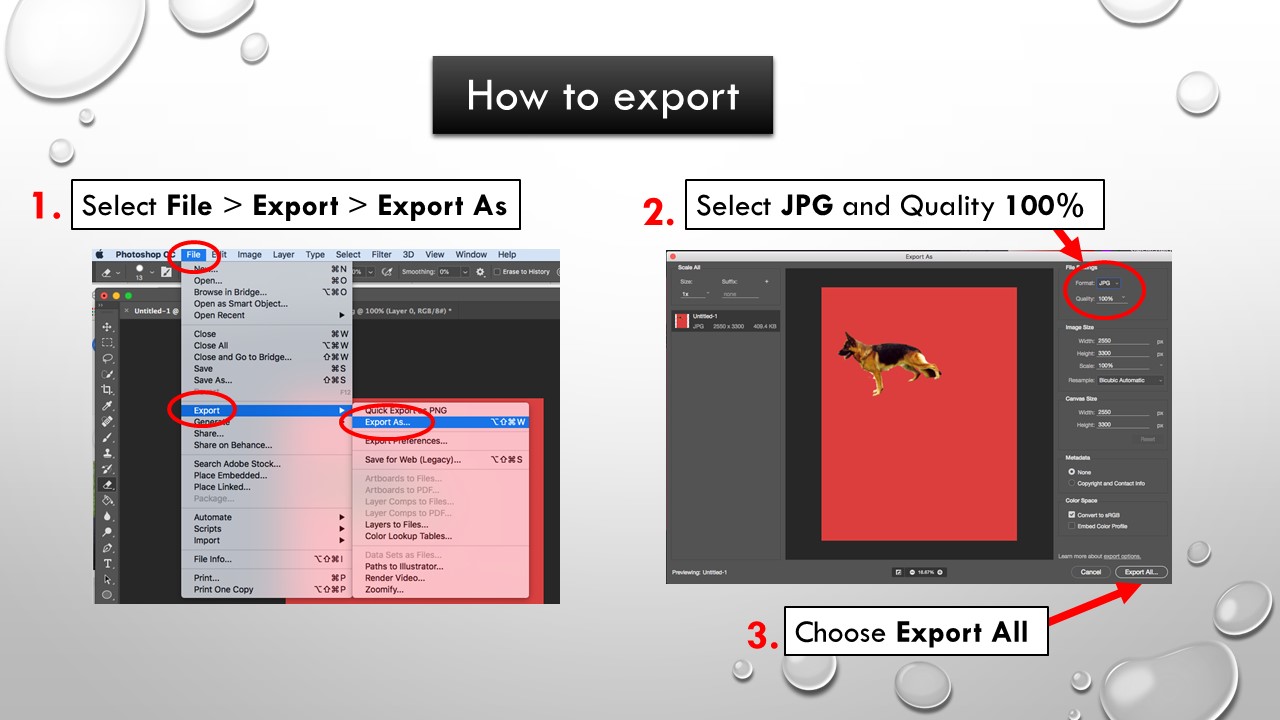
Export to JPG
My tutorial will teach you how to export your creation. We export our collage to a JPG because that’s a common image format. However, there are actually lots of file formats that you can export your image to. For example, if you ever need a transparent background, you will need to export to a PNG! I’ll show you where to find that.
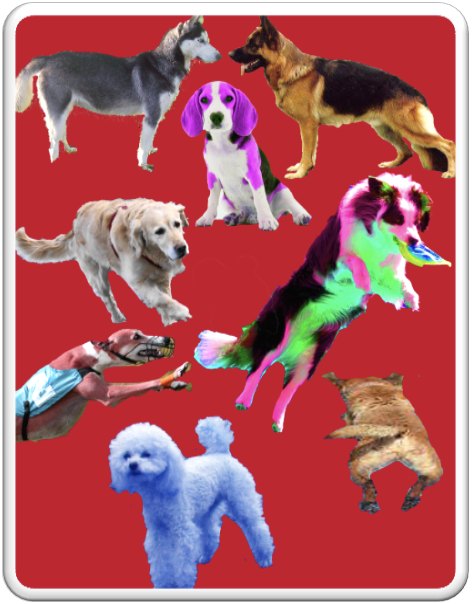
Create a Collage
Once you’ve learned how to remove the background on an image and how to make image adjustments, you will be ready to tackle more dogs! As part of the lesson, you are provided with a folder of dog pictures. Remove those dogs from their backgrounds and arrange them artfully into your very own dog collage!
More Photoshop Lessons
Looking to learn more Adobe Photoshop skills? I have 14 lessons, covering everything from head swapping to creating your own vintage t-shirt! Each lesson has step-by-step directions and culminates in an independent activity for students to apply their learning. All of the media for both the lesson and the activity is always included.
- Lesson 1: Making a Collage (FREE)
- Lesson 2: Formatting Text
- Lesson 3: Building Layers
- Lesson 4: Fantasy Landscape
- Lesson 5: Face Morphing
- Lesson 6: Distressed Textures
- Lesson 7: Turning Photos into Art
- Lesson 8: Photo Manipulation
- Lesson 9: Text Tricks
- Lesson 10: Making Animations
- Lesson 11: Room Enhancement
- Lesson 12: Portrait Correction
- Lesson 13: Head Swapping
- Lesson 14: Retouching Tools
These are all also available in a Google Slides version.
Discounted Photoshop Bundle
Would you like a discount? Purchase my 14 Lesson Adobe Photoshop Bundle. Also available in Google Slides.

More Technology and Digital Design Lessons?
Looking for more technology and digital design lessons for you or your students? I have lessons for other Adobe products like Illustrator , InDesign, Premiere Pro, and After Effects. You can even purchase my entire Digital/Graphic Design Curriculum (Semester Long) or my Adobe Tools Bundle. Trying to build your own graphic design course? You are welcome to grab the full outline of my Digital Design course (FREE)

Teaching coding? Check out my FREE lesson for 3rd-6th graders or my FREE lesson for 7th-10th graders. I also have lessons for Microsoft Applications, such as Word, PowerPoint, and Excel.
Check Out My TpT Store!
Did you enjoy this project? Check out my TpT store: Miss B’s Shop . I create a variety of resources such as Scratch Coding lessons, Technology & Digital Design lessons, Literary Analysis lessons, Novel Studies, and more!
Adobe Photoshop CC Beginner?
Are you an Adobe Photoshop beginner or a teacher guiding your students through this program? If so, was this tutorial helpful? What did you find helpful or difficult in this tutorial? What other lesson topics would help you improve your graphic design skills? Tell me in the comments section!